
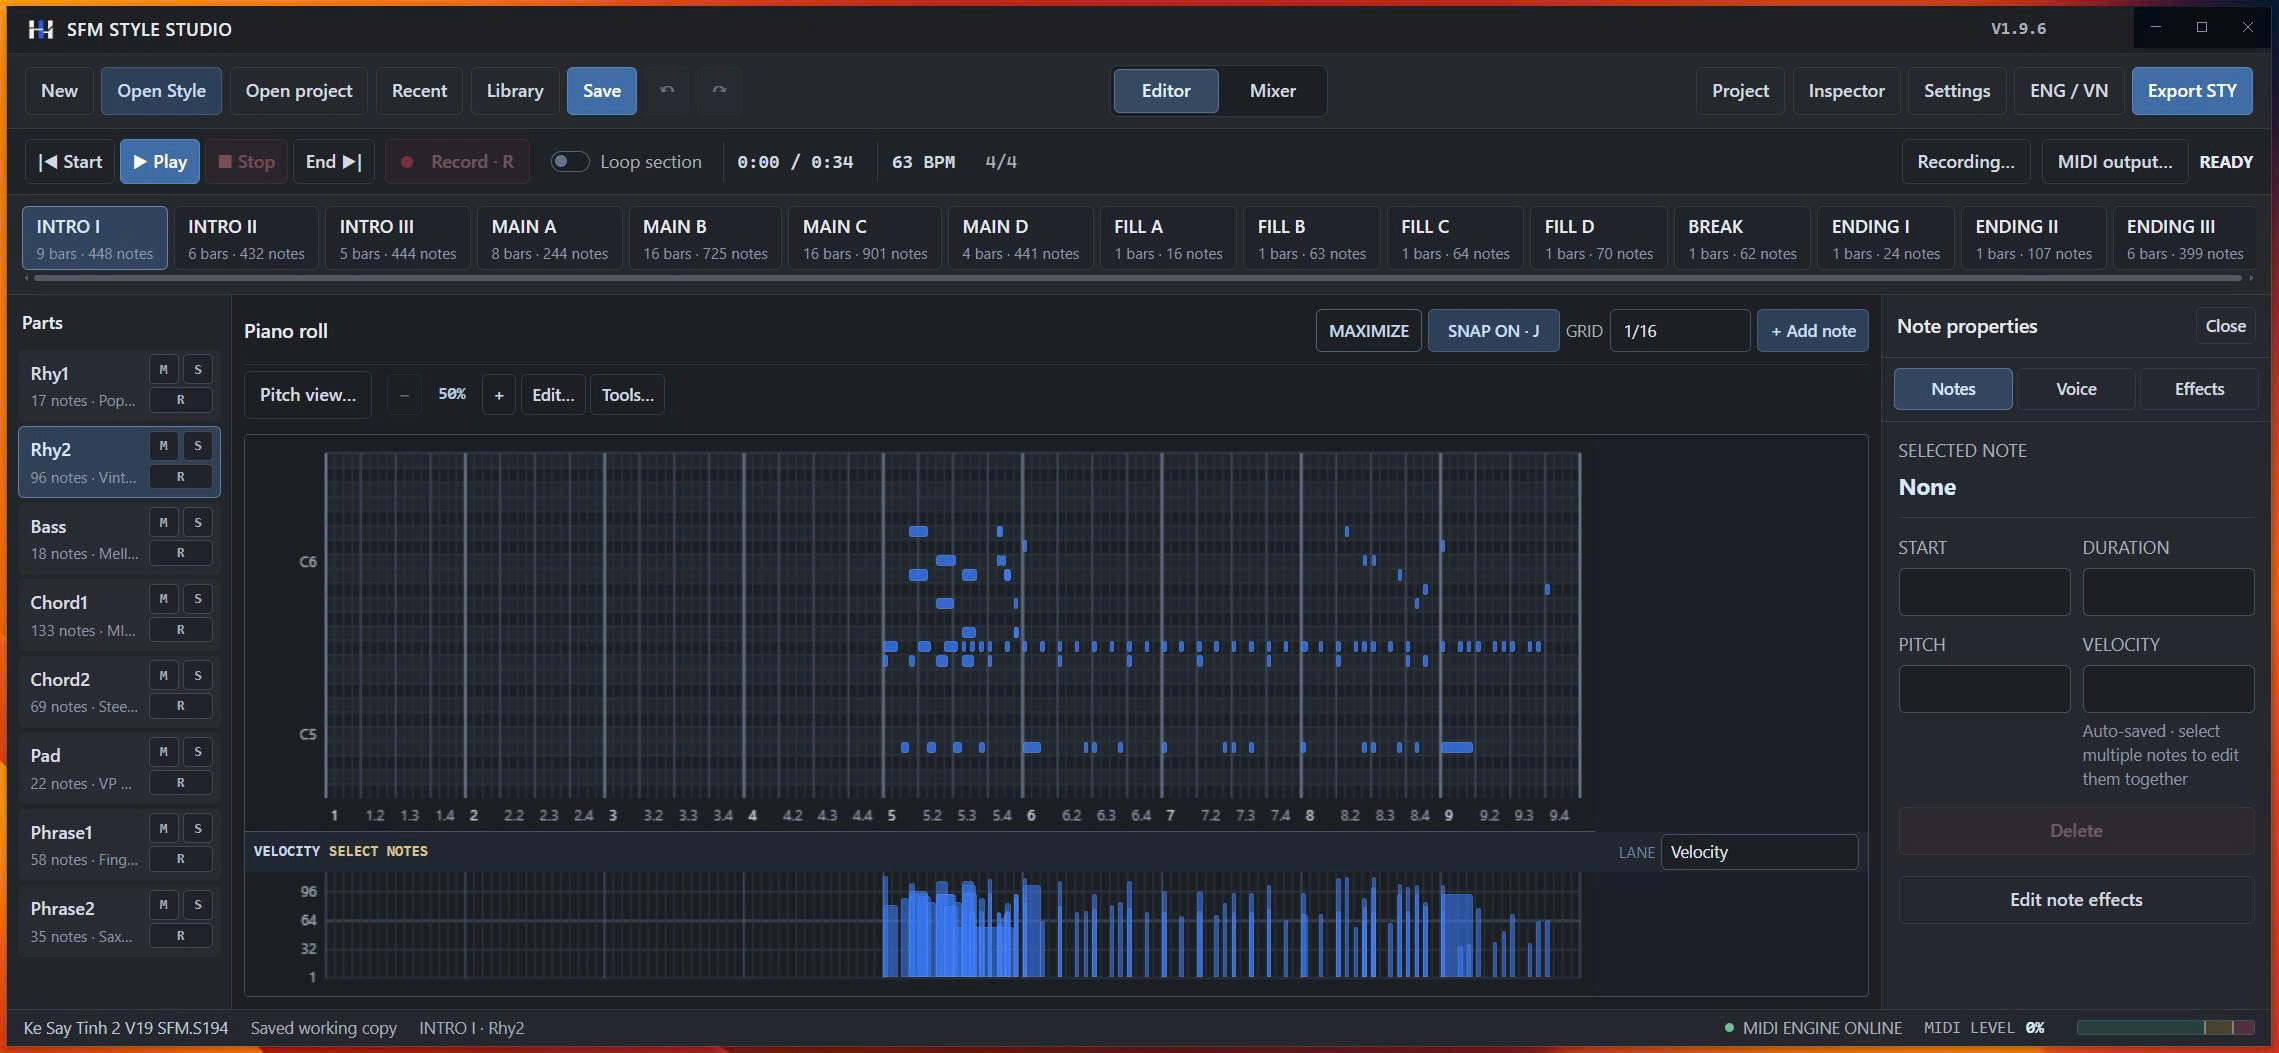
What SFM Style Studio does
Open an existing Yamaha .STY file, continue an editable .sfmstyle project, or create a blank Style. Select a section and Part, edit or record MIDI phrases, adjust supported sound controls, then export a new Style for testing on your Yamaha keyboard. Live MIDI audition uses the connected instrument to generate sound.
Important: This is a MIDI and Style editor, not an audio-recording workstation or software synthesizer. It does not host DAW audio plug-ins or process separate audio tracks from the keyboard. Use the ENG / VN button to switch between English and Vietnamese.
Piano Roll editing
Edit note pitch, timing, duration and velocity. Use Grid and Snap for placement, Quantize for existing notes, and copy or paste phrases while keeping their musical shape together.
Record and audition
Record MIDI into an armed Part, loop a section and use Mute or Solo to check each musical layer through a connected Yamaha keyboard.
Mix and export
Control supported Volume, Expression, Sustain, Reverb, Chorus, Filter and Part EQ settings, then export a Yamaha Style with post-export data verification.
User Guide
Open the sections below for a practical guide to setup, editing, recording, mixing, exporting and troubleshooting.
1. MIDI and audio setup
For hardware playback, connect MIDI from the computer to the keyboard. For MIDI recording, also connect MIDI from the keyboard to the computer. A supported USB-MIDI connection may provide both directions; otherwise use a suitable MIDI interface. Audio is separate: listen through the keyboard audio outputs and your normal monitoring system.
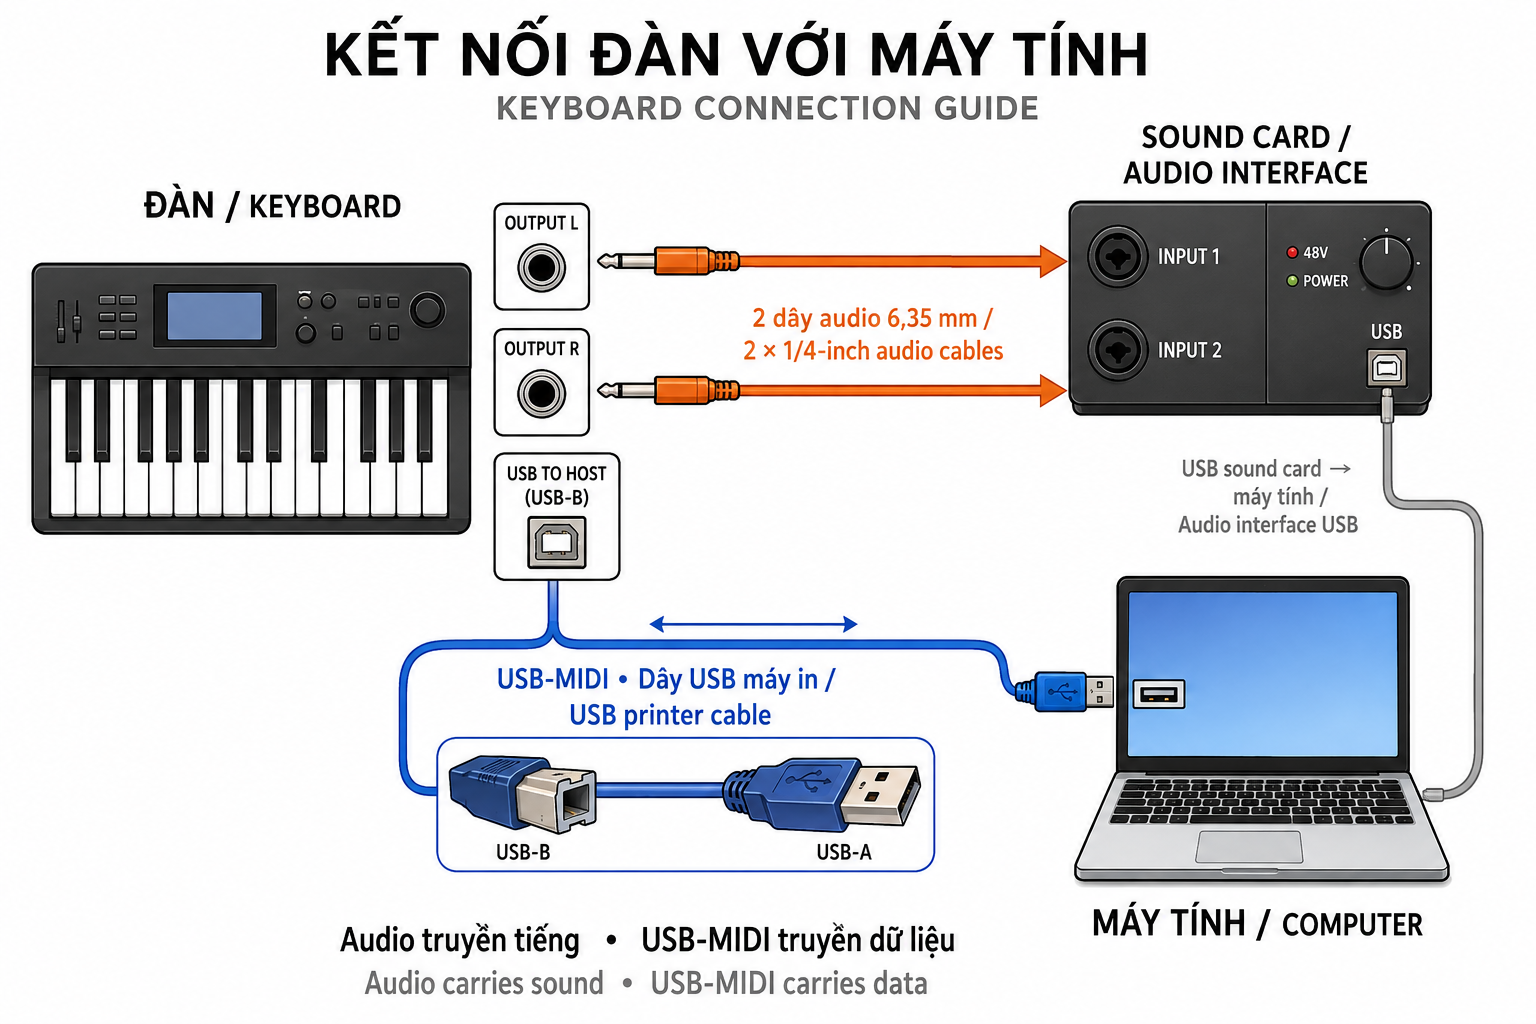
Video guide: Connect Audio and MIDI
Step-by-step video showing how to connect Audio and MIDI for SFM Style Studio.
Video guide: First setup in SFM Style Studio
Watch this first setup guide before connecting MIDI and starting a new Style project.
- Turn on the keyboard and connect it to the computer.
- Click Recording… and choose the MIDI input that receives your performance.
- Click MIDI output… and choose the output connected to the Yamaha instrument.
- Check that the keyboard MIDI Receive settings accept the required channels.
For Genos system-effect control, allow System Exclusive messages. If MIDI activity is visible but there is no sound, check MIDI output, keyboard receive routing, selected sounds and audio monitoring.
2. Start a project and choose sections
Open Style: choose a Yamaha .STY file and select the section and Part to edit. Open project: use a .sfmstyle file to continue work with application-specific editing information. New: configure tempo, time signature, sections and bar lengths, then add notes, record MIDI or insert patterns from the Library.
The 15 section slots are Intro I–III, Main A–D, Fill A–D, Break and Ending I–III. A blank project still needs musical content, suitable Voice assignments and appropriate chord-conversion settings.
3. Parts, Piano Roll and playback
Each section contains Rhy1, Rhy2, Bass, Chord1, Chord2, Pad, Phrase1 and Phrase2. Select a section first, then choose its Part. M mutes, S solos and R arms a Part for recording; these audition controls do not delete notes.
In Editor, click notes to select them, drag horizontally for timing, vertically for pitch, or drag an edge for duration. Use + Add note or double-click to add notes; right-click to delete. GRID controls resolution, SNAP aligns supported edits, and the lower Velocity lane changes MIDI velocity. For playback, confirm MIDI output, set the yellow cursor, click Play, use Loop section when needed, and click Stop to finish.
4. Record MIDI performances
- Select the destination section.
- Click R on the Part that should receive the recording.
- Open Recording…, select MIDI input and a channel, or choose OMNI.
- Set count-in and recording quantization, then place the yellow cursor.
- Press Record, play, then press Stop.
The take records into the armed Part. Recording uses overdub, so new notes are added rather than replacing existing notes automatically. Recording stops at the section boundary; set section length before recording a longer take.
5. Mixer, Genos effects and sound controls
Click Mixer. With Apply to all sections enabled, changes target the corresponding Part across project sections; off applies only to the selected section. Enable Live Yamaha preview to send supported changes while editing.
Controls include Volume, Expression, Sustain, Chorus send, Reverb send, Filter Cutoff/Resonance and supported Part EQ. In Chorus / Reverb, choose a Genos Type, set Return, click Apply live to Genos, adjust each Part send level and audition. These operate Genos hardware effects, so always test the exported Style on the target keyboard.
6. Quantize, patterns, Library and controllers
Open Tools → Quantize, choose notes or the current Part, select size and Strength, then compare by listening. Fit to bars adjusts a phrase to a target span rather than quantizing timing.
Use Tools → Beat Repeat or Drum Roll on a rhythm Part. In Edit note effects, apply supported Modulation, Expression, Sustain, Resonance, Cutoff, Reverb or Chorus envelopes to selected notes. The Library scans a local Yamaha Style collection, lets you preview a pattern and replace selected Rhy1/Rhy2 Parts; save first because this replaces destination drum Parts.
7. Voices, chord rules, saving and export
Use Tools → Change voice or Voice properties to choose a catalog entry or set Bank MSB, Bank LSB and Program. Expansion Voices require matching expansion content on the keyboard; naming a Voice in the app does not install the sound. Use Tools → Chord rules (advanced) to inspect supported CASM settings. Keep existing rules for an imported working Style unless you understand the intended change.
Video guide: Choose Yamaha and Expansion Voices/Drums
Learn how to select default Yamaha keyboard Voices and Drums, or compatible Expansion Voices and Drums in SFM Style Studio.
Click Save to store the editable .sfmstyle master. Click Export STY, review validation information, export to a new .STY, then test sections, Voice/Drum assignments, levels, effects, chord response, transitions and endings on the target keyboard.
8. Version / Phiên bản: 1.9.15 limitations and troubleshooting
Version / Phiên bản: 1.9.15: Pan and Auto Pan editing are temporarily disabled while under development. Volume remains available and existing Pan data in Styles is preserved.
- No sound: check MIDI output, keyboard receive routing, notes in the section, Mute/Solo and audio connections.
- Wrong Voice: confirm Bank/Program values and required expansion content.
- Reverb/Chorus inactive: check Part send, global Type, Return, MIDI routing and SysEx reception.
- Duplicated notes: inspect existing overdub notes and duplicate MIDI routing.
- Export unavailable: check validation, compatible structure and license status.
- Wrong language: use ENG / VN.
Recommended everyday workflow
Open or create a project → select a section and Part → edit or record → audition → adjust the mix → save the project → export a new Style → test it on the keyboard.
Try SFM Style Studio for 7 days
Download the Windows installer, connect your Yamaha keyboard by MIDI and explore the full editing workflow.
Download Free 7-Day TrialCompatible Yamaha keyboard lines
SFM Style Studio can be used with Yamaha PSR-S and PSR-SX series keyboards, Tyros 1, 2, 3, 4 and 5, plus Genos 1 and Genos 2. Always test an exported Style on the target keyboard and confirm its Voice, expansion-content and system compatibility.